Tuesday, December 28, 2010

Working Method - Jonathan Keep

Having just got my first printed ceramics outof the glaze firing I thought it would be a good time to offer a post on my current working method. On and off for the last ten years I have been using 3D computer modelling programs, mainly as a tool to train my visualisations memory and explore new forms. Using numerical transformations the computer can generate forms I would not otherwise conceive of. Scaling, particularly uneven scaling or scaling only in one direction I have always find interesting. The human eyes aptitude for responding to symmetries is another area I have explored both in 2D and 3D software. Morphology and the evolution of form is a third technique I use. The 3D program can calculate the transition from one form into another offering the possibility to capture a new form at any point along that transformation.


Recently I have started using Blender, an open source 3D program that offers great possibilities and I can see myself spending a lot of time with it. Unfortunately the most recent version does not yet have .stl export, the file type used to convert to code that the ceramic printer understands. So saved as .obj files I do the conversion to .stl in Netfabb Studio. What is useful in Netfabb is that the surface area of the form is given so I can make the necessary adjustments to make sure I will be able to print the object from one 60 ml syringe of clay paste. The saved .stl file is then opened in the BfB Axon program and finally the form is cut up to make a g-code file that goes on a memory card ready for the printer. The BfB Axon program has a minefield of settings that are required when using a self made printing head as with ceramics. This is another posting in itself and while I am still trying different syringes ( I want to be able to hold a greater volume of clay for each print) it will be a while before I know what my settled ceramic print head settings will be.

Three stages in preparation for printing – Blender, Netfabb and BFB Axon.


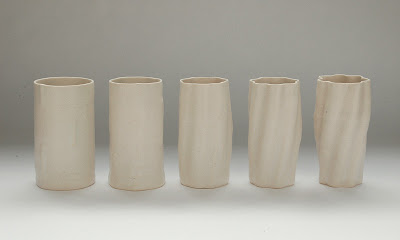
Morphology of glazed printed porcelain forms – height 9cm each.


Simple glazed printed porcelain scaled forms – 6 to 3 cm high.

Thursday, December 23, 2010

Shipping robots

I unpacked one of our printers that came back from an exhibition in Abu Dhabi last november and found that two of the four corners where completely loose, thats four grub screws for each corner that popped out of their place so now the vertical bar slides freely in the corners.
Funny thing is that when I unpacked them in Abu Dhabi, the crate was damaged and not very rigid anymore but the printer wasn't. I fixed the crate before shipping back and now it is the opposite.


Looks like I will need to take this one apart and reassemble correctly again, he was a bit wobbly in the first place...

And I will need to look into ways to better pack the machines, I always fill the crate with foam. Also on the bottom there is 3 cm foam in which the feet are plugged so the foam sits flush with the horizontal bottom bars. Will need to look into ways to improve this.

So fellow robot travelers, how do you ship your machines?

Tuesday, December 21, 2010

Kilns part 1: OpenKilnController

Last Christmas I got a small, almost new 8 liter kiln from my uncle who owns a large dental lab. He got it when he bought a whole lot of material in a liquidation and it was to big for them. Small for us is large for their industry, they use tiny desktop kilns, maybe 250 cc that fit a few tooth in them. The only problem was that it was only the kiln with the heating elements and no controller, thermocouple or relays. Buying all the necessary gear through our local pottery supplier would have made us ± 600€ lighter! So having a little tinker ethos I figured that it would be easy to build something yourself using an Arduino as a controller and a Solid State Relay to switch the 2 Kw elements. Not being such a great programmer or electro-engineer I dived into google thinking that this must have been done before considering the prices of commercial controllers,  some code would probably be available to get you started. Well, google turned op close to 0 hits so apparently there are not enough potters with programming/engineering background or hackers that like clay? After doing lots of research, driving to holland to pickup some old analog industrial temperature controllers, thermocouples and relays, requesting manuals for gear from the 80s from japanese companies I finally threw in the towel and bought a 300€ controller kit that was a perfect fit for small kilns like ours. I found this kit through all the googling (so never a waste of time) and figured that it was not worth it to continue my search for a DIY solution since I really lack the skills to pull it off from scratch. The ST222 kit I bought included a controller, thermocouple and relays and was made buy the UK company Stafford Instruments. So here's our inferno in a box.


I still love the idea of a DIY kit controller, I calculated the costs of a DIY solution to be around 150€ (Thermocouple 60€, Arduino 30€, SSR 30€, Display for Arduino, buttons etc 20€) which was a quarter of the initial commercial solutions and would allow you to preprogram all curves from a computer instead of using the awkward interfaces of commercial solutions and even monitor the kiln with plotted curves on the computer. The solutions on the market are really basic in functionality. While the 300€ controller was a sweet enough deal for our small kiln I still think a DIY controller would be very interesting for larger kilns. So I hope someone wants to pick up my mission for the OpenKilnController.

Here is what I have found so far, kiln controllers are PID controllers (I never heard of them, remember my lack of skills) and they appear to be very common in industrial control systems.  There is already a pretty decent PID library for Arduino. (http://www.arduino.cc/playground/Code/PIDLibrary) that could be used as a starter. The hardware is straight forward as mentioned above, you need a thermocouple as analog sensor, the Arduino with PID library as controller and a SSR as switching mechanism for the kiln. The tricky part looks to be the 'tuning' of the P, I and D parameters.
I also found some rforum posts over at arduino about 
DIY Arduino PID controllers so at least some people tried like PWillard.


UPDATE: While typing this post I revisited the forum thread I mentioned above and apparently GlennD did build a kiln controller for a glass fusing Kiln. Unfortunately only after I bought the ST222.